© Ian Robertson and Mark Dyson, 2012
Introduction
Diving wouldn’t be quite the same without O-rings. They seal the valve to your tank, your regulator to the tank valve, occur at numerous points in your regulator, on torches and in camera cases. They reliably seal liquids and gases at a variety of pressures (1-250 bars or more), they form rotating, sliding and static seals and put up with tremendous abuse. In fact, we depend on them. Despite their reliability, they need looking after. Some need expert attention but others, you can maintain yourself. If you understand them, you can maintain them properly and use them intelligently.
The aircraft industry first used the neoprene O-ring. Now a host of O-ring materials (nitrile, neoprene, viton, hypalon, acrylic, fluorosilicone, silicone, polyurethane) are used extensively in hydraulic (liquid driven) and pneumatic (gas driven) systems. We find them in high altitude oxygen systems, the space shuttle, deep oil-well pumps, motor car engines and even at the end of the common garden hose. Where would we be without them?
Principle
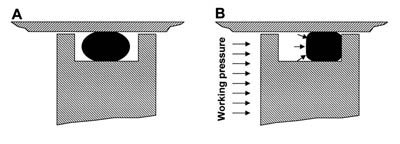
The principle is simple. When under pressure, the O-ring behaves much like a mixture of a solid and a viscous liquid. It transmits the working pressure to the points where it makes contact. It distorts and is forced up against the surfaces that it seals. It seals ever tighter with increasing pressure (Figure 1B). Above all, the O-ring needs clean, well fitting, smooth surfaces to seal properly. It leaks on rough or dirty surfaces. If any rotation or sliding whilst under pressure is expected, the O-ring seal surfaces need to be polished and lubricated or there will be excessive wear. To seal, the O-ring is very lightly pinched (5–10% of O-ring section diameter) between the seal surfaces before pressure is applied (Figure 1A), it doesn’t need to be crushed excessively.
Figure 1. The principle of the O-ring. The O-ring is lightly pinched between the seal surfaces before pressure is applied (A). Pressure causes the ring to distort and ride up into the gap, which is sealed tighter with increasing pressure (B).
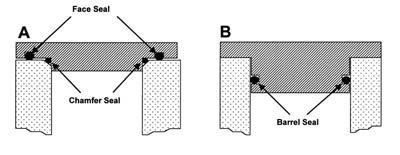
There are two main types of O-ring designs - face seals and barrel seals. Recognising the type of seal helps you use them properly. Face seals (Figure 3A) rely on squeezing the O-ring between the end or face of the housing and the cap (e.g., dive light lens). A variant is the chamfer seal. They need to be tightened sufficiently to pinch the seal; after that, increased pressure on the cap generally tightens the seal more.
Barrel seals (Figure 3B) rely on a snug fit of the cap into the housing and, provided the seal is designed properly, it works, however tight the cap is secured. It should not be over-tightened as this will not improve the seal and may damage something.
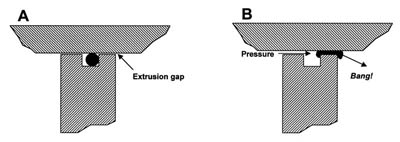
Figure 2. O-ring extrusion and failure. If the extrusion gap for a given pressure is excessive (A), under pressure the ring will distort excessively, extrude through the gap and the seal will fail (B).
High-pressure applications
Generally the only high pressure O-ring that you deal with, seals your regulator to your tank valve, though there are others in the tank valve and regulator. The regulator-to-valve seal is a face seal and relies on you doing it up sufficiently to ensure the extrusion gap is minimal or ‘BANG’. That is why a regulator should be attached firmly. These O-rings are generally unlubricated and may not take kindly to rotation while under pressure, though this is generally difficult. It’s also a good reason why a tank should not be lifted by the regulator first stage. This applies a twisting action to the seal faces, increasing the extrusion gap on one side and ‘BANG’!
Figure 3. O-ring seal types. Face seals need to be tightened initially but some are self-tightening with pressure. Barrel seals do not need to be over-tightened and rely on good design and manufacture.
Cleaning and maintaining camera and dive light O-rings
Low-pressure O-rings are common in dive lights and cameras. If you dive in adverse conditions, such as in dirty, sandy or salty water, sand and salt can work into the seal, causing a leak. Clean all user-accessible O-rings regularly, preferably every diving day or at battery or film changes. You should carefully consider the consequences of a leaking O-ring and maintain it with the dilligence due.
Do this after the equipment has had its post-dive fresh water soak (this dissolves most of the dried salt in the seal). Dry the gear and open it. Remove the O-ring, by pinching it between fore-finger and thumb and push in line with the plane of the ring (Figure 4). This stretches the O-ring slightly and causes part to rise out of its groove. Slip a blunt instrument, like the corner of a credit card or a plastic O-ring picker under it, to stop it sliding back, and gently ease it out of its groove. Don’t use a sharp metal instrument or you will damage the ring or (worse) the seat. Don’t over-stretch the O-ring. Wipe all grease and dirt from the ring with a clean, soft, lint-free cloth (an old handkerchief will do). While cleaning the O-ring, inspect it for wear, nicks and cuts (a magnifying glass and a strong light helps). Replace it, if it is damaged or worn – never risk re-using a damaged O-ring. Carefully re-lubricate the ring with grease (whatever grease is recommended by the manufacturer); place a small dab on your fingers and slide the O-ring between them until the whole O-ring looks shiny. There should be no gritty feel – if there is, clean, inspect and lubricate again. A properly lubricated O-ring is smooth and slick with grease, but has no grease blobs. This allows it to slide properly in the groove and seal properly. Excess grease attracts dirt.
Use an O-ring lubricant that is appropriate for the O-ring. Some O-rings are incompatible with certain lubricants, may deteriorate rapidly as a consequence and fail, Lubricants are generally not used with high-pressure air or nitrox, unless oxygen compatible (very expensive lubricant, e.g Crystalube). For Nitrox, even the O-ring should be oxygen compatible (Viton A). These O-rings are generally fitted dry.

Clean the O-ring groove with a cotton bud and wipe clean all other associated sealing surfaces, inspecting them as you go for scratches, corrosion, chips and dents and place them all somewhere clean. Damaged sealing surfaces might leak. Replace the freshly lubricated O-ring in its groove, inspect for stray lint or hair (eye-lash or cat hair will cause a significant leak) and reassemble the equipment, ensuring all functions smoothly and all is as tight as it should be.
- If you do this after diving, your gear is ready for use the next time you dive when, sure as eggs, you won’t have any time for maintenance!
- Avoid being caught out, keep a spare set of O-rings (cylinder valve, camera and dive light) together with a lint-free cloth, a few cotton buds, a plastic O-ring picker and a tube of O-ring grease in a small kitchenware box with a snap-on-lid in your dive bag.
- Never assemble gear in a hurry, particularly cameras, or it will leak one day.
Figure 4. Pinch the O-ring seal between fore-finger and thumb and push until part rises out of the groove.
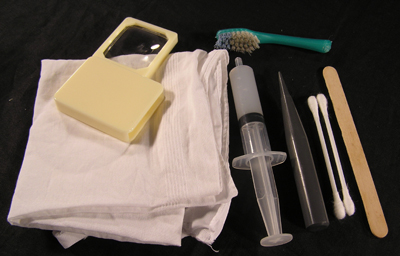
An O Ring Tool Kit
O O-rings in low-pressure applications, such as camera and dive light seals that are
exposed to dirty water, need regular cleaning and lubrication with the appropriate grease.
Cleaning the O-ring is best done with a lint-free cloth. This is almost a contradiction
in terms, but a very old cotton handkerchief or pillowcase, that has been washed and
washed and washed, is the nearest thing to lint-free. An old toothbrush is ideal for
cleaning screw threads, and cotton buds are great for cleaning O-ring grooves.
The O-ring can be captured with a smooth, blunt plastic tool or a plastic card, as you gently lift it from
its seat. You can make this tool from the handle of the toothbrush, shaping it with a
file and sandpaper. This tool can also be used to accurately apply small amounts of
grease to O-ring sealing surfaces in small sockets.
The grease has a way of getting everywhere but only a minimum of grease should
be used. If the grease is transferred to a 6 ml disposable plastic syringe using a paddle-pop
stick, the syringe can be used to apply the grease directly to the O-ring or groove with
the minimum of handling.
A small disposable syringe can be bought over the counter from your pharmacist for only about fifty cents, and is well worth the minute expense. Make sure that, on assembling the equipment, all seals are free of strands of fluff, eyelashes, cat-hairs and grit, and the O-ring is correctly seated. A small magnifying glass may help, if your eyesight is not quite what it was. So, we now have a small tool kit that you can keep clean and dry in a plastic sandwich box with a snap-on lid.